Visual Studio Code is the most popular open-source, cross-platform IDE for software developers and it supports various programming languages, such as C++, C#, Python, Java, and more. Besides being a professional development IDE, VS Code is an excellent educational tool for teaching students programming languages. I have been teaching Java to students and I think VS Code is a better choice of IDE than others such as jGRASP, IntelliJ,IDEA or Eclipse. In order to use VS Code for Java development, you must do the following two things:
- Install “Extension Pack for Java” which is developed and maintained by Microsoft
- Install a Java SDK
In Windows, it is quite easy to set up VS Code for Java development so I will not cover it here. If you use VS Code in Ubuntu, you will need to do some extra work to set up VS Code.
Install Extension Pack for Java
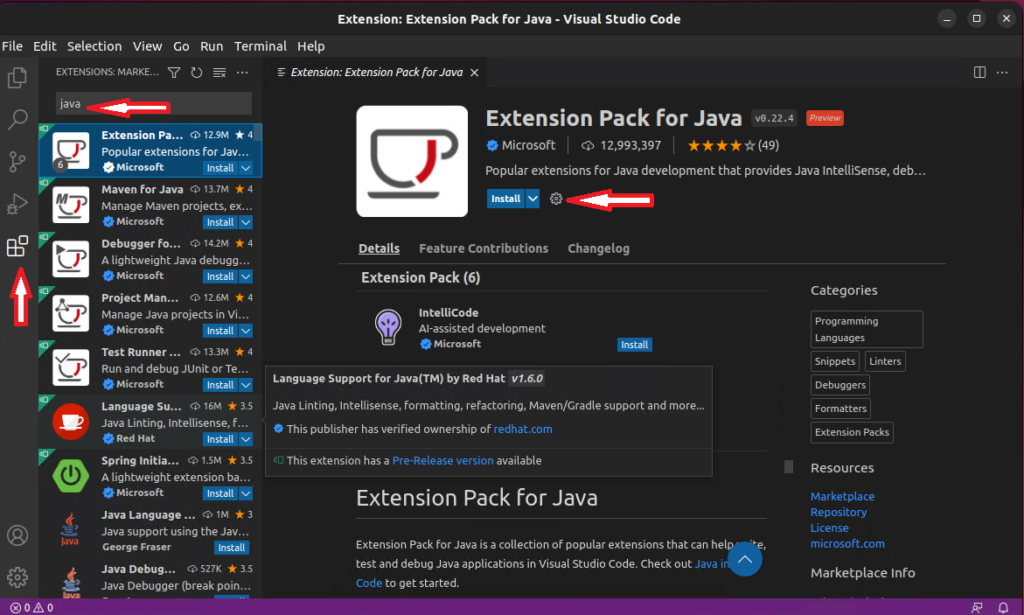
After VS Code is installed, click the Extensions icon on the left, then type “Java” in the search box and install Extension Pack for Java.
Install a Java JDK
After installing Extension Pack for Java, you will need to install a Java JDK. Click View and choose Command Palette (or Ctrl + Shift + P), then type in Install New Java and click the first entry in the search list. You will see a window as shown in the following screenshot:
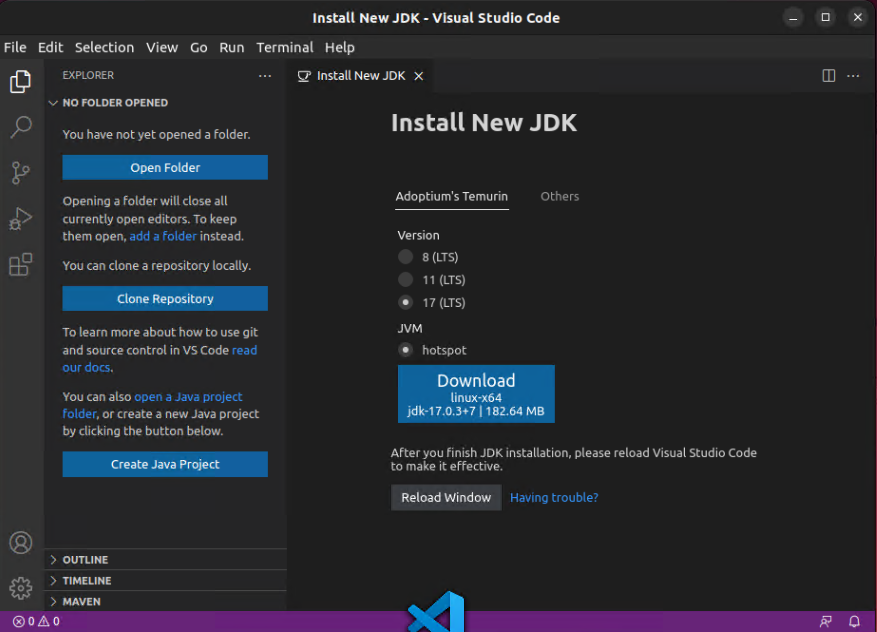
VS Code recommends a list of Java JDK’s:
- Amazon Corretto
- Azul Zulu
- Eclipse Adoptium’s Temurin
- Microsoft Build of OpenJDK
- Oracle Java SE
- Red Hat build of OpenJDK
- SapMachine
But you are not limited to the list above, for example, in this post I will show you how to install the prebuilt OpenJDK in Ubuntu 22.04 LTS and how to configure it to work with VS Code.
In Ubuntu, launch a terminal window then run the following command:
sudo apt install openjdk-17-jdkOpenJDK 17 is an LTS version of Java JDK and is recommended for software development.
After OpenJDK-17 is installed, we need to set up the environment variables such as JAVA_HOME and PATH so that VS Code can locate the Java JDK to run Java code. The Windows JDK installer can automatically set the environment variables, but in Ubuntu, we have to manually set them up.
In the same terminal, run the following command:
export JAVA_HOME=/usr/lib/jvm/java-1.17.0-openjdk-amd64In Ubuntu, the default JDK installation location is “/usr/lib/jvm/java-1.17.0-openjdk-amd64”. If you install Java JDK in a different location, you will need to replace the location path in the above command with the correct location.
In the terminal, run the following command to set up PATH:
export PATH=$PATH:$JAVA_HOME/binTo verify the installation of OpenJDK, run the following command:
java -versionAnd you will see a screen as follows, depending on the version of OpenJDK you installed:

Now, your VS Code is successfully set up for Java development. To verify, close VS Code and run it again. If you still see the “Install New JDK” screen, you can close it. Then click Terminal -> New Terminal in VS Code, in the Terminal panel at the bottom of VS Code, type “java -version” and press Enter, you should see the same OpenJDK information as above, and it means VS Code is ready for Java development.


Did all of that on Ubuntu 22.04 and stil not working, it just don’t recognize java.
VS Code sometimes does not recognize Java for some unknown reason. However, as long as you can verify the installation of OpenJDK as shown in the last step in the post, you will be able to develop Java in VS Code. Hope this helps.