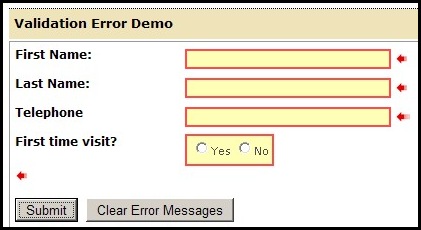
We are all familiar with ASP.NET validators and know how to use them to give user instant response when invalid data is entered. Today, I am going to show you an enhanced way to display validation errors by using JavaScript and ASP.NET valiation client API, for instance, when a control causes a validation error, besides display an error message (or an icon), we can add a red border around the control and also change its background to catch user’s attention, as shown in the following screen shot:

The basic idea of this enhancement is to add a style to the control that causes the validation error. Of course, it can be done by manually adding some JavaScript code on each control, but it will be definitely tedious and hard to maintain. So we need to find a way to implement the style automatically.
1. The best way to add style is through CSS:
.errordiv
{
    background-color: #ffff99;
    filter: alpha(opacity=70);
    opacity: 0.7;
    border: #ff0000 2px solid;
}
The above style will add the red border and a yellow background to the control.
2. Create a JavaScript function to call ASP.NET validation client API to validate the page, and then add the style for the controls that failed the validation:
function validatePage()
{
    Page_ClientValidate(); // ASP.NET validation client API
    changeBorderOnValidation();
}
Page_ClientValidate() is a client API for ASP.NET validation. This function will loop through all validators on the page to validate its associated control and mark “true” or “false” on the validator. “changeBorderOnValidation” is a custom JavaScript function that applies style or strip off style based on the validation result.
function changeBorderOnValidation()
{
    //Reset the hidden field
    var hdn = document.getElementById('hdnFailedControlNames');
    hdn.value = "";
    var i;
    // Loop throgh all validators
    for (i = 0; i < Page_Validators.length; i++)
    {
        var c = Page_Validators[i]; // get individual validator
        // get the control associated with the validator
        var ctrl = document.getElementById(c.controltovalidate);
        if (ctrl != null) // if found the control
        {
            if (c.isvalid) // if validation passed
            {
                // and also the control's name
                // is not stored in the hidden field,
                if (hdn.value.indexOf(ctrl.name) == -1)
                {
                    // then strip off the error style
                    // so the control can use its
                    // original style
                    ctrl.className = ctrl.className.replace("errordiv", "");
                } // otherwise, don't do anything about the style.
            }
            else  // if validation failed
            {
                // if the error style has not been added yet
                if (ctrl.className.indexOf("errordiv") == -1)
                {
                    // then add the error style in front of
                    // the control's original style
                    ctrl.className = 'errordiv ' + ctrl.className;
                } // otherwise, if the error style was already
                  // added before, then no need to add it again.

                // now store the failed control name
                // in the hidden field.
                hdn.value = hdn.value + ctrl.name + "|";
            }
        }
    }
}
The first line of the above function is to get a hidden field called “hdnFailedControlNames”, which stores the names of the controls that failed the validation.
<input id="hdnFailedControlNames" type="hidden" value="" />
The reason is that a server control might be validated by multiple validators, for instance, a TextBox control can be validated by a RequiredFieldValidator and a RegularExpressionValidator, so if the TextBox fails one of the validator, there is no need to test it against the other validator. The comments in the JavaScript function should explain the function very well.
3. How to trigger the JavaScript function?
First of all, the function “validatePage()” needs to be called when the Submit button is clicked, so we set the Submit button’s OnClientClick=”validatePage();”
<asp:Button ID="btnSubmit" runat="server" Text="Submit" OnClientClick="validatePage();" />
Secondly, we need to add two lines of code in the JavaScript block so that “changeBorderOnValidation()” is called on every key stoke. This way, we don’t need to manually add “ontextchange”, or “onclick” events to the server controls on the page.
document.onkeyup =  changeBorderOnValidation
document.onclick = changeBorderOnValidation


Thank you very much. This is really helpful.
Regards,