Popup window can be very helpful for editing records. For example, you have a GridView of your customers, when you click on a row or an “edit” button/icon, a new window pops up for you to edit the selected customer. After the editing is done and the record is saved, the popup window is closed and the parent window is reloaded to reflect the updated information. This is a very common scenario for using parent/child window to display and update information, there are several ways to implement this scenario.
1. Parent/Child Window Design with Regular Popup
Here is a demo: http://www.sardonyxtech.com/demos/Parentchildwindowdemo/Parent_CustomerList.aspx
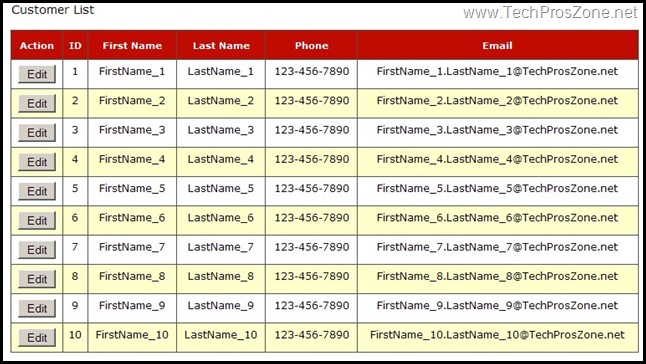
Parent window:
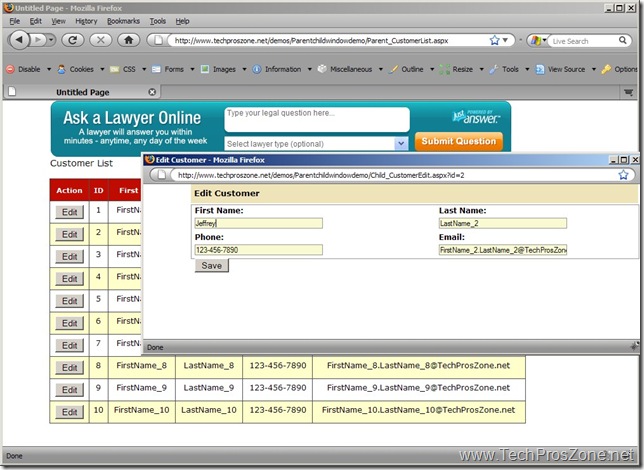
Child Popup Window:
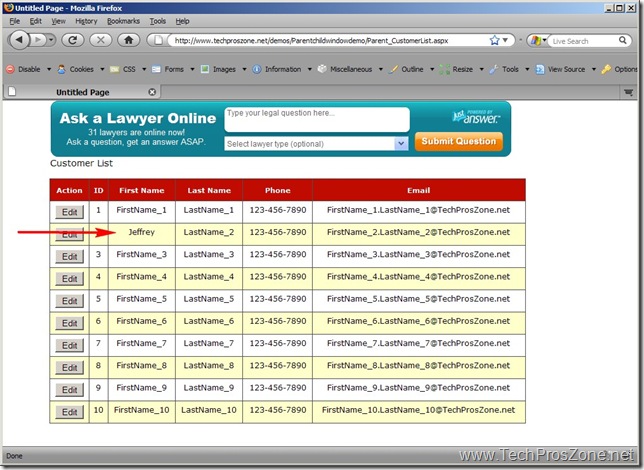
Parent window is automatically refreshed after the child window is closed.
Now let’s see how to implement this simple solution.
I will skip the steps of binding the GridView and will focus on how to use JavaScript to open the child window, how to close the child window and refresh the parent window.
The “Edit” button in the GridView is a Button control defined in a TemplateField and we need to add the JavaScript to the Button’s onclick event. It can be done either in the GridView’s RowCreated or RowDataBoudn event handler, here I use the RowCreated event handler:
Private Sub gvCustomerList_RowCreated(ByVal sender As Object, _
        ByVal e As System.Web.UI.WebControls.GridViewRowEventArgs) Handles gvCustomerList.RowCreated
    If (e.Row.RowType = DataControlRowType.DataRow) Then
        Dim btn As Button = CType(e.Row.FindControl("btnEdit"), Button)
        If (btn IsNot Nothing) Then
            Dim id As Integer = Me.gvCustomerList.DataKeys(e.Row.RowIndex).Value
            btn.Attributes.Add("onclick", "window.open('Child_CustomerEdit.aspx?id=" & id & _
                "', 'EditCustomer', 'toolbar=no, statusbar=no, location=0,resizable=yes,width=800,height=600'); return false;")
        End If
    End If
End Sub
The child window contains this JavaScript function to close itself and refresh the parent window:
<script language="javascript" type="text/javascript">
    function closeWindow()
    {
      var url = window.parent.opener.location.href;
      window.opener.location.href = url;
      window.close();
    }
</script>
Some people use window.opener.location.reload to reload the parent window, but the problem with this approach is that the child window is popped up after the parent window is posted, so when you use window.opener.location.reload to refresh the parent window, the page will need to be re-posted, and browser will throw out a message asking you to confirm the reload process. It is very annoying. The approach I use in the JavaScript function is basically a redirect to the page itself, but not reload.
This JavaScript function is called in the child page’s Button click event handler after the data is saved in the database:
Protected Sub btnSave_Click(ByVal sender As System.Object, _
        ByVal e As System.EventArgs) Handles btnSave.Click

    'Save data in the database

    ClientScript.RegisterStartupScript(Me.GetType(), _
            "ClosePopup", "closeWindow()", True)

End Sub
There is something you will need to pay attention to when using this design. For example, the child window is just another normal page, it means any knowledgeable user can manually type in the URL to the child window, which defeats the purpose of this parent/child design. So you will need to prevent this from happening.
Here is the way I use to prevent the direct access to the child window:
(1). Create a JavaScript function as follows:
function checkParent()
{
    var par = window.parent.opener;
    if (par == null)
    {
        window.location.href = "";
    }
}
What it does is if the parent window handler is null (direct access to the child window), then redirect the child window to an empty URL, which will generate 404 error. Then in your global.asax you can use Application_Error event handler to redirect user to a generic error page. This JavaScript function needs to be put in <body onload=”checkParent()”> of the child window.
2. Parent/Child Window Design with AJAX ModalPopup
With AJAX we can accomplish the same task as above but don’t need to worry about the direct access to the child window, because the child window is an AJAX ModalPopup.
Here is a demo: http://www.sardonyxtech.com/demos/ParentchildwindowAJAXDemo/Parent_CustomerListAJAX.aspx
I will not go into details on how to implement AJAX ModalPopup in this case because it is very straightforward to do. With this design, you don’t have to worry anyone would directly access the child popup window and you are able to use UpdatePanel to avoid full postback.
However, what if AJAX is not a viable option for you? The good news is that we can use JavaScript and some CSS tricks to simulate AJAX ModalPopup.
3. Parent/Child Window Design with JavaScript and CSS
Here is a demo: http://www.sardonyxtech.com/demos/ParentChildWindowDemo/Parent_CustomerListJavaScript.aspx
This approach looks like AJAX ModalPopup, but it does not use ModalPopup or UpdatePanel. It uses only JavaScript and CSS to load the popup and to close the popup. Now let’s see how to implement this approach:
a). We need two Panel controls in which one is for the background and the other is for displaying data:
 <asp:Panel ID="pnlEditCustomer" runat="server" style="display:none;" CssClass="popup-div-background"  >
     <asp:Panel ID="pnlCustomerInfo" runat="server" CssClass="popup-div-front"  >
     <div class="section-heading">Edit Customer</div>
     <div class="section-information">
         <div class="form-cell-left">
             <asp:Label ID="lblFirstName" runat="server" EnableViewState="false" CssClass="label-cell">First Name:</asp:Label>
             <asp:TextBox ID="txtFirstName" runat="server" CssClass="inputBox" MaxLength="10"></asp:TextBox>
         </div>
         <div class="form-cell-right">
             <asp:Label ID="lblLastName" runat="server" EnableViewState="false" CssClass="label-cell">Last Name:</asp:Label>
             <asp:TextBox ID="txtLastName" runat="server" CssClass="inputBox" MaxLength="10"></asp:TextBox>
         </div>
         <div class="clear-div"></div>
         <div class="form-cell-left">
             <asp:Label  id="lblPhone" runat="server" EnableViewState="false" CssClass="label-cell">Phone:</asp:Label>
             <asp:TextBox ID="txtPhone" runat="server" CssClass="inputBox" MaxLength="12"></asp:TextBox>
         </div>

         <div class="form-cell-right">
             <asp:Label ID="lblEmail" runat="server" EnableViewState="false" CssClass="label-cell">Email:</asp:Label>
             <asp:TextBox ID="txtEmail" runat="server" CssClass="inputBox" MaxLength="30"></asp:TextBox>
         </div>
         <div class="clear-div"></div>
         <div class="form-row">
             <asp:Button ID="btnSave" runat="server" Text="Save" OnClientClick="hidePopup()" /></div>
     </div>
  </asp:Panel>
</asp:Panel>
b) The styles for the two Panel are listed as follows:
.popup-div-background
{
    position:absolute;
    top: 0;
    left: 0;

    background-color:#000;
    filter:alpha(opacity=90);
    opacity:0.9;

    height: 100%;
    width: 100%;
    min-height: 100%;
    min-width: 100%
}
.popup-div-front
{
    background-color: #f8f8ff;
    color: black;
    width: 70%;
    text-align: left;
    vertical-align: middle;
    position: absolute;
    top: 5%;
    left: 15%;
    bottom:5%;
    font-weight:bold;
    padding: 10px 5px 5px 5px;
}
The .poup-div-background set width, height, min-width, min-height to 100%, so that the panel will cover the whole screen. The opacity style give the background panel some transparency. These styles actually do the trick to simulate AJAX ModalPopup window.
c). By default, the outer panel “pnlEditCustomer” is invisible because its style=”display:none;”, so it will not show up when the page is loaded. We will use JavaScript to display the panel. Here is the JavaScript function:
function displayPopup()
{
    var popup = document.getElementById('<%=pnlEditCustomer.ClientID%>');
    popup.style.display = "block";
    return false;
}
We will use the GridView’s RowCommand to call the JavaScript function by using ClientScript.RegisterStartupScript:
Private Sub gvCustomerList_RowCommand(ByVal sender As Object, _
        ByVal e As System.Web.UI.WebControls.GridViewCommandEventArgs) _
            Handles gvCustomerList.RowCommand
    If (e.CommandName = "cmdEdit") Then
        Dim id As Integer = Integer.Parse(e.CommandArgument.ToString())
        ViewState("ID") = id
        Me.LoadCustomerInfo()
        ClientScript.RegisterStartupScript(Me.GetType(), _
            "displayPopupWindow", "displayPopup()", True)
    End If
End Sub
d). We also need a JavaScript function to hide the popup after user clicks “Save” button:
function hidePopup()
{
    var popup = document.getElementById('<%=pnlEditCustomer.ClientID %>');
    popup.style.display = "none";
    return true;
}
Then we can simply set the Save button’s OnClientClick=”hidePopup()” so that when the button is clicked the popup will become invisible. In the code behind where the Save button’s OnClick event is handled, we can simply save the changes and rebind the GridView to reflect the new changes.
I personally like the third option because it is clean, has less overhead, and secure.


