0. Why I wrote this post?
FCKEditor is an open-source, rich text editor for the web application, its features include multi browser compatibility, XHTML1.0 output, CSS support, font and text formatting, image insertion with upload and server browsing, table creation and editing, spell checking, toolbar customization, and more. It also integrates with many major web application languages, such as ASP, ASP.NET, PHP, Java, ColdFusion, Perl, JavaScript and more. Although there is a developer’s guide on FCKEditor’s official web site on how to install, configure, integrate and customize FCKEditor in ASP.NET web application, it is not detailed enough for the first-time user and lacks of screen shots in each step. I hope this post will be a step-by-step tutorial for those who are interested in integrating FCKEditor with ASP.NET.
1. Configuring Your Development Environment
This post will focus on the integration of FCKEditor 2.6.3 with ASP.NET 2.0, and might also work with the future version of FCKEditor. The development environment used in this post is Microsoft Visual Studio 2005.
Unlike the integration with other web languages, the integration with ASP.NET requires two components:
- FCKEditor .NET package: an ASP.NET control compiled into a DLL to easily integrate FCKEditor on ASP.NET web pages. You can download the latest version of FCKEditor.Net package from sourceforge.net.
- FCKEditor main code: the editor itself. Because FCKEditor.NET package does not include the FCKEditor main code (script file, such as the html, JavaScript, images, etc), you will also need to download the editor separately. The editor itself can also be downloaded from sourceforge.net.
After the above two packages are downloaded, unzip them to two different directories on your computer.
1.1. Reference FCKEditor in ASP.NET
Like any other DLL files, you will need to add a reference to FCKEditor.NET DLL in your ASP.NET project before you can use it. You have two options to do it:
- Manual copy. Go to the directory where you have unzipped and saved the FCKEditor.NET package, then go to bin/Release/2.0 folder to copy FredCK.FCKeditorV2.dll file and paste it into your project’s bin folder.
- Adding a reference in your project. Right-click your project name from the Solution Explorer in Visual Studio 2005, and select “Add Reference…” option. Then click “Browse” tab and select the FredCK.FCKeditorV2.dll file from the directory mentioned in the “Manual copy” step.
1.2. Toolbox Setup for FCKEditor in ASP.NET
This step is optional if you are comfortable to manually register FCKEditor control on ASP.NET web page like this:
<%@ Register Assembly="FredCK.FCKeditorV2" Namespace="FredCK.FCKeditorV2" TagPrefix="FCKeditorV2" %>However, if you would like to be able to drop and drop the FCKEditor control from the Toolbox in Visual Studio 2005, then you will need first add the FCKEditor control in the Toolbox. To add a control in the Toolbox is very stright-forward, but before we add the new item to the Toolbox, I would like to first add the FCKEditor DLLfile to the GAC of my computer, so when I add the FCKEditor control to the Toolbox, the control will be loaded from GAC and be independent from where I have saved it in, thus deleting or moving the DLL file will not break my Toolbox.
a). Add FCKEditor assembly (dll) to the Global Assembly Cache
Launch .NET Framework 2.0 Configuration (Control Panel –>Administrative Tools->.NET Framework 2.0 Configuration), then click “Add an assembly to the assembly cache”
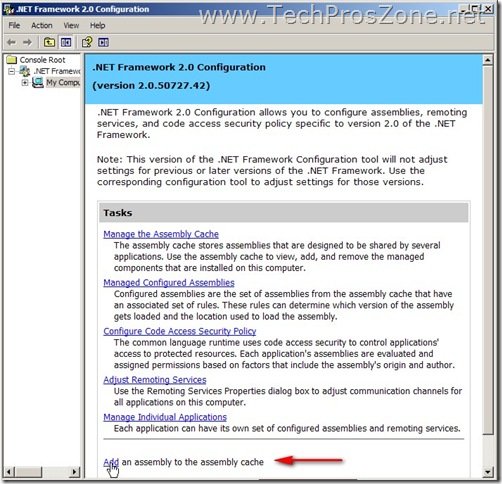
Browse to the directory where you have saved the DLL file and select the file, then click “Open”.
Close out .NET Framework 2.0 Configuration.
Switch to Visual Studio 2005 IDE and open your Toolbox. If this is your first third-party control be added, you might want to add a new tab in the Toolbox so it won’t be mixed up with other controls. To do so, right-click any empty space in your Toolbox and select “Add Tab”. Give a name to the new tab, say “Third-party”.
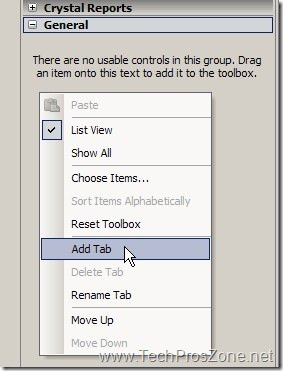
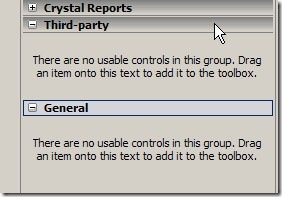
Now we can add the FCKEditor control to the Toolbox. Right-click the empty space under the “Third-party” tab and click “Choose Items…” option. When “Choose Toolbox Items” window pops up, click “Browse” button.
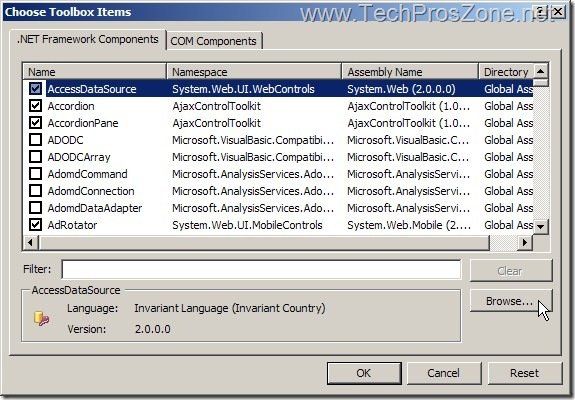
Browse to the folder where you have saved the DLL file and select the DLL file, then click “Open” (or double-click the file).
The DLL will be loaded from the GAC because it is already added in the GAC.
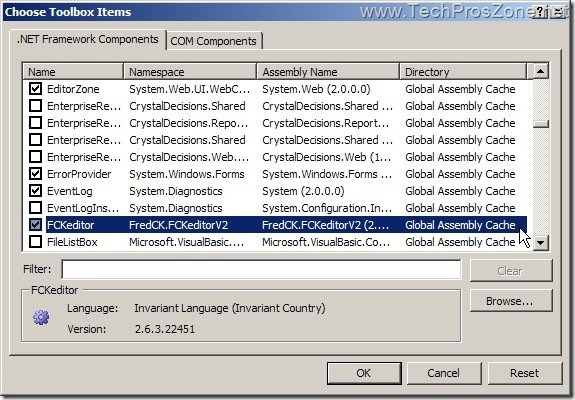
Click “OK” to close out the window and go back to the Visual Studio 2005 IDE. Now the FCKEditor control is successfully added in the Toolbox.
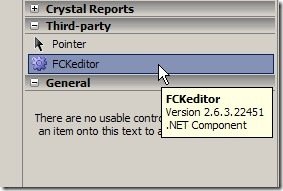
The development environment has been configured to use the FCKEditor control. Now let’s see how to actually use and customize the FCKEditor.
2. Using FCKEditor in Web Application
Let’s write a simple demo page to show how to use this nice editor, and then I will talk about how to customize the editor.
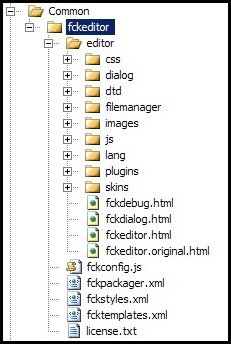
The first thing we need to do is to include the actual editor files (main code as mentioned earlier such as the html, css, js, and image files) in our project. Let’s add a new folder called “Common” in the domo project, then copy the unzipped editor files including its subfolders to the “Common” folder.
By default, all files are stored in a folder called “fckeditor” after unzip.
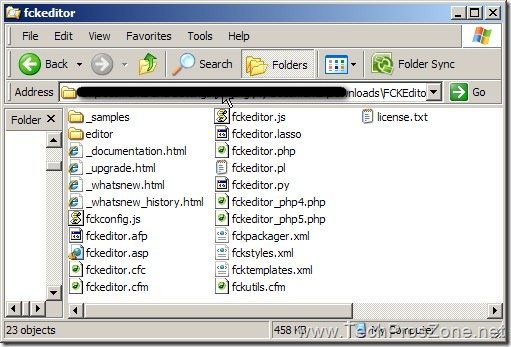
However, not all the files are needed. So let’s first remove some of the files/folders to reduce the total size of the editor before we include it in our project.
- All folders/files start with an underscore “_” can be removed
- Any skin you are not using from the “editor/skins” directory can be removed
- Any “smiley” collection you are not using from the “editor/images/smiley” directory can be removed
- Any plugin you don’t need from the “editor/plugins” directory can be removed
- Any connector you don’t need from the “editor/filemanager/connectors” directory can be removed.
- Any “fckeditor.ext” file you don’t need from the root of the editor package can be removed. In ASP.NET, we can remove files such as fckeditor.js, fckeditor.afp, fckeditor.cfc, etc.
- Any “<lang>.js” file you don’t need from the “editor/lang” directory can be removed. In our case, we only need en.js file.
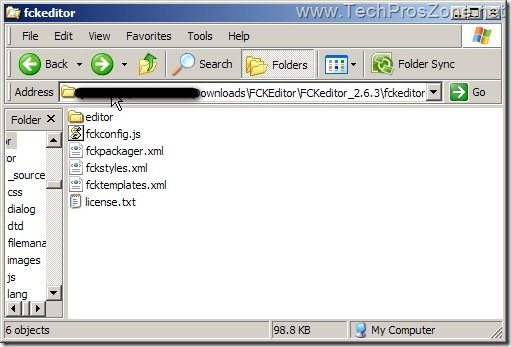
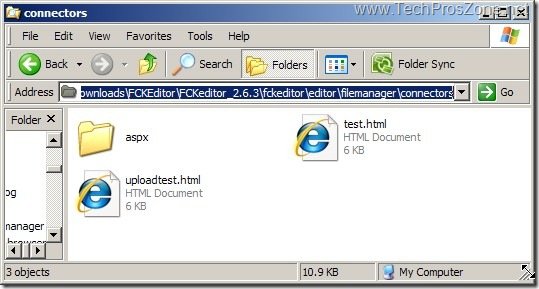
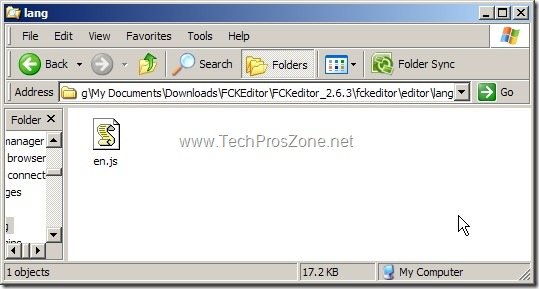
After the trim, we can copy the “fckeditor” folder and its contents to the “Common” folder and then include the entire “fckeditor” folder in our project.
Now let’s add new web page called “FCKEditorDemo.aspx”, and drag and drop a FCKEditor control from the Toolbox on the page.

There are some properties you can change in the Properties window. Right now, let’s set Width=”750px”, Height=”400px”, and leave all the others with the default values. In code-behind, you will need to set the FCKEditor’s BasePath property (you can set it in the Properties window, but I found it is easier to set it in the code):
Protected Sub Page_Load(ByVal sender As Object, ByVal e As System.EventArgs) Handles Me.Load
    If Not IsPostBack Then
        Me.FCKeditor1.BasePath = Request.ApplicationPath() & "/Common/fckeditor/"
    End If
End Sub
You will also need to set ValidateRequest=”false” in the Page directive, otherwise, upon postback, ASP.NET will throw an exception error. The FCKEditor control has built-in validation to stop malicious code input, so you don’t need to be concerned about setting ValidateRequest=”false”.
Compile and run the demo page, you will see a page like this:
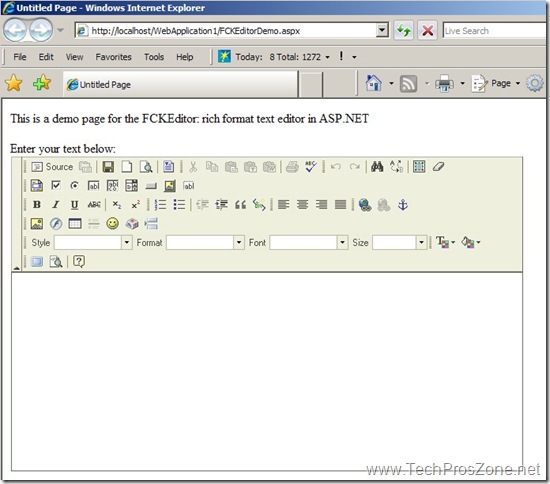
In next post, I will show you how to customize the FCKEditor, such as the functionality, the toolbar items, etc. So stay tuned.


Thanks
This has been the best post for getting the FCK up and running in ASP.NET. If you could drop me an email or post how you got the ‘Save’ icon to work on the server side in ASP.NET I’d be eternally grateful. I’d like to open a document on the server edit it and save it back to the server. I can see that the ‘Save’ button fires a postback but how do I know when it did and where to capture that event to save the value field.
Hi Dave, do you define your FCKEditor in another control, say a FormView, DetailsView, or GridView, or is it just a stand-alone FCKEditor on the page?
I got to till just before this step successfully, but the control didn’t get added to the toolbox. Any idea why? I followed every step closely.
“Now the FCKEditor control is successfully added in the Toolbox.”
@Jaybee,
Try this:
close all Visual Studio IDE windows, then open a new VS window and repeat the steps in my post.
how to put validation in fckeditor
@A
If you are still using FCKEditor which has been replaced by CKEditor, then you will have trouble with ASP.NET. According to the documentation of FCKEditor, FCKEditor does not work well with ASP.NET RequiredValidator, for more information, check http://docs.cksource.com/FCKeditor_2.x/Developers_Guide/Troubleshooting#AspRequiredField